
Sale!

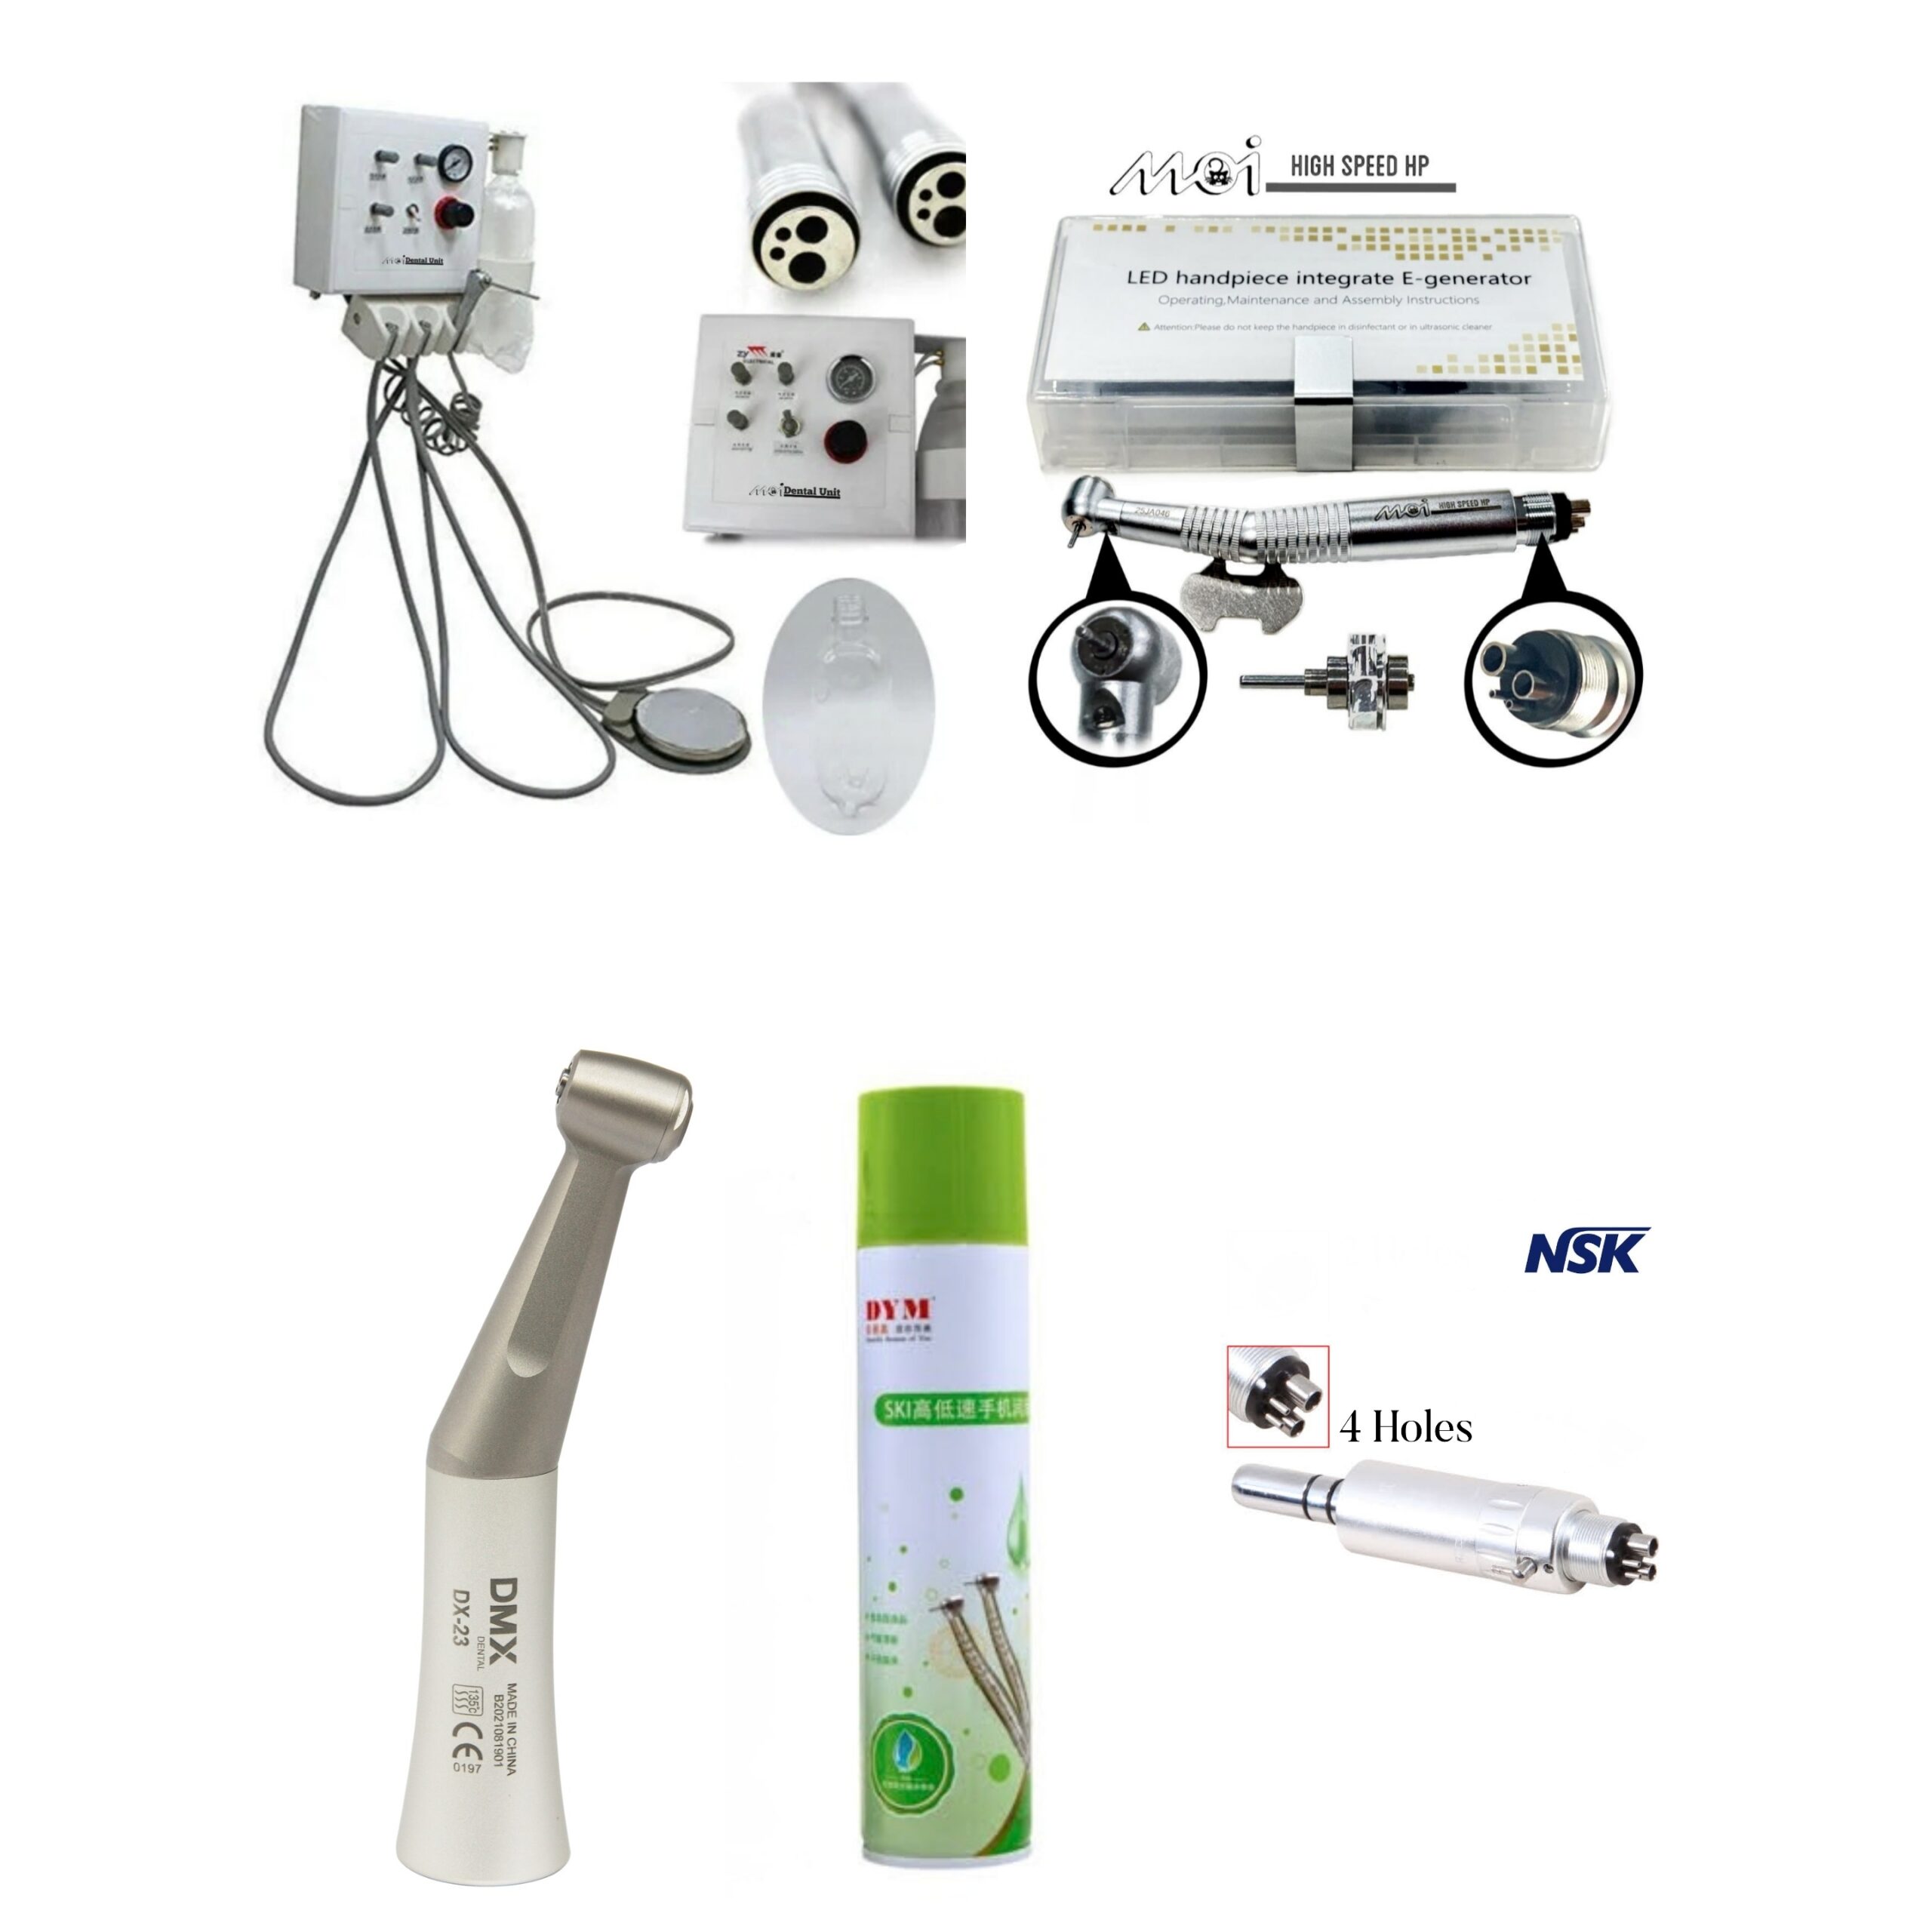
Complete Operatory Attachment Bundle — Wall Unit + Handpieces + Lubricant

Original price was: $495.29.Current price is: $421.00.

To ensure optimal performance and safety, please remember to oil the handpiece daily and store it out of reach of children.

This handpiece is covered by 3-months cartridge replacement warranty. Proper handling and storage away from children are essential for warranty eligibility.

All materials/stuff sold by MoiADC are for ADC students to be used for education purposes only. “SIMULATION USE ONLY”

This integrated operatory bundle equips your clinical or simulation setup with the key tools you need for restorative and procedural dentistry. The components are matched to work together, offering smooth interoperability, performance, and maintenance convenience.

What’s Included

Component

Description

Connection / Compatibility

Function / Workflow

Wall Mounted Dental Unit

Compact, wall-mounted delivery module that supplies air, water, tubing, and handpiece control ports. Includes foot control and holders.

Connects to air & water lines (4-hole ports)

Central unit powering both high-speed and low-speed handpieces.

Kavo LED High-Speed Handpiece (4-Hole)

Premium high-speed turbine handpiece with integrated LED illumination for enhanced visibility.

Connects directly to wall-mounted unit (4-hole)

Used for cutting, cavity preparation, and tooth reduction.

NSK Air Motor (4-Hole)

Reliable low-speed air motor with adjustable speed and reverse function.

Connects directly to wall-mounted unit (4-hole)

Drives low-speed attachments such as the contra-angle handpiece.

DMX Contra-Angle Slow-Speed Handpiece

Durable contra-angle attachment for finishing, polishing, and slow-speed restorative work.

Attaches to NSK Air Motor

Used for finishing and polishing stages after high-speed cutting.

High-Quality Handpiece Lubricant Oil Spray (330 mL)

Precision aerosol lubricant for handpieces and air motors to reduce friction and extend lifespan.

Universal spray nozzle fits all standard handpieces

Used before and after each procedure for maintenance and performance.

Key Features & Benefits

Seamless Integration — All handpieces and the motor connect easily to the wall-mounted unit’s 4-hole ports for effortless switching between high-speed and low-speed operations.

Optimized Performance — The Kavo LED High-Speed Handpiece offers high torque and bright illumination for precision work. The DMX Contra-Angle, driven by the NSK Air Motor, ensures smooth, controlled low-speed finishing.

Durability & Maintenance — The Lubricant Oil Spray protects internal bearings, prevents overheating, and extends lifespan. Recommended for pre- and post-sterilization use.

Space Efficiency — The Wall-Mounted Dental Unit saves floor space, making it ideal for simulation benches, compact clinics, or teaching setups.

Cost-Effective Bundle — Get all the core operatory components together, tested for compatibility, with excellent value for clinics, educators, and students.

Suggested Use Workflow

1. Install the wall-mounted dental unit at ergonomic height near the phantom head or dental chair.

2. Connect air and water lines and test all ports.

3. Attach the Kavo LED High-Speed Handpiece to the high-speed (4-hole) outlet.

4. Connect the NSK Air Motor to the low-speed outlet and attach the DMX Contra-Angle Handpiece to it.

5. Lubricate all handpieces with the High-Quality Oil Spray before and after use.

6. Use the high-speed handpiece for cavity prep and cutting, then switch to the slow-speed contra-angle for finishing and polishing.

7. Perform regular maintenance: clean filters, replace O-rings, and check all tubing and bearings.

HP Maintenance Recommendations

To maintain the efficiency of the handpieces and ensure long-term, reliable performance, please follow these recommendations:

1. Use Distilled Water Only

Always use distilled water instead of tap water in the water bottle.

Tap water contains minerals and impurities that can accumulate inside the tubing and the turbine of the handpieces. Over time, these deposits may cause blockages, reduce performance, and lead to the formation of limescale and mineral residues, which can damage the internal components.

2. Ensure the Compressor Has an Air Filter

The air compressor should be equipped with an appropriate air filter.

Dust particles and contaminants carried by unfiltered air can enter the dental unit and handpieces, causing blockages, reducing efficiency, and contributing to the buildup of internal deposits.

3. Daily Lubrication and Cleaning

Use a suitable handpiece lubricating oil spray and anti-deposit cleaning spray every day.

* Apply the spray before the first use of the day.

* Apply it again after finishing work at the end of the day.

The spray should be applied through all inlet and outlet openings (ports) of the handpiece to ensure proper lubrication, cleaning of internal components, and removal of moisture and debris.

Regular maintenance will significantly prolong the lifespan of the handpieces and help maintain optimal performance.

Portable Dental Unit – Installation and Operating Instructions

Contents of the Box

The package includes the following items:

* Portable Dental Unit

* Transparent air supply tube

* Connection tubing for the High-Speed Handpiece

* Connection tubing for the Slow-Speed Handpiece

* Triplex syringe (pre-connected to the dental unit)

* Foot pedal pre-connected to the dental unit

* Water bottle

Installation Instructions

1. Positioning the Dental Unit

Place the dental unit in a stable vertical position. Ensure there is sufficient distance and space to place the foot pedal comfortably on the floor for easy operation.

2. Connecting the Handpieces

* The first tube, located on the right side of the dental unit, is for connection to the High-Speed Handpiece.

* The second tube, located in the middle, is for connection to the Slow-Speed Handpiece.

* The third tube, located on the left side, is connected to the Triplex Syringe.

3. Filling the Water Bottle

Fill the water bottle to approximately three-quarters (¾) of its capacity only. Do not fill it completely, as sufficient air space must remain inside the bottle to generate the appropriate internal pressure required to deliver water properly.

4. Connecting the Transparent Tube

Connect the transparent tube to the dental unit as follows:

1. Locate the fixing screw at the bottom of the dental unit and loosen it.

2. Insert the screw onto the transparent tube.

3. Connect the transparent tube to the metal connection port.

4. Tighten the screw securely to ensure there is no air leakage.

The other end of the transparent tube requires a suitable connector/adaptor (to be purchased separately) in order to connect it to the air compressor.

Compressor Pressure Adjustment

After connecting the dental unit to the compressor, check the pressure gauge on the dental unit.

If the gauge reads below 30 psi, the airflow from the compressor is insufficient.

To correct this:

1. Open the airflow control valve on the compressor gradually.

2. Operate the handpiece while observing the pressure gauge.

3. Adjust the compressor output until the pressure gauge on the dental unit reads approximately 90 psi.

Important: Do not adjust or tamper with the pressure regulator on the dental unit itself. The unit has already been calibrated and is ready for use. All pressure adjustments should be made only from the compressor side.

Final Checks Before Use

After completing all connections between the dental unit and the compressor, ensure that the following switches on the dental unit are turned ON:

* Air Switch – ON

* Water Switch – ON

* Water Bottle Switch – ON

Once these switches are turned on and the pressure is adjusted correctly, the dental unit is ready for operation.

May cause allergic reactions in sensitive individuals. Users are responsible for assessing suitability before use.For educational simulation use only. Not for clinical or patient use.
SKU: 577 Categories: ,

Description

This integrated operatory bundle equips your clinical or simulation setup with the key tools you need for restorative and procedural dentistry. The components are matched to work together, offering smooth interoperability, performance, and maintenance convenience.

What’s Included

Component

Description

Connection / Compatibility

Function / Workflow

Wall Mounted Dental Unit

Compact, wall-mounted delivery module that supplies air, water, tubing, and handpiece control ports. Includes foot control and holders.

Connects to air & water lines (4-hole ports)

Central unit powering both high-speed and low-speed handpieces.

Kavo LED High-Speed Handpiece (4-Hole)

Premium high-speed turbine handpiece with integrated LED illumination for enhanced visibility.

Connects directly to wall-mounted unit (4-hole)

Used for cutting, cavity preparation, and tooth reduction.

NSK Air Motor (4-Hole)

Reliable low-speed air motor with adjustable speed and reverse function.

Connects directly to wall-mounted unit (4-hole)

Drives low-speed attachments such as the contra-angle handpiece.

DMX Contra-Angle Slow-Speed Handpiece

Durable contra-angle attachment for finishing, polishing, and slow-speed restorative work.

Attaches to NSK Air Motor

Used for finishing and polishing stages after high-speed cutting.

High-Quality Handpiece Lubricant Oil Spray (330 mL)

Precision aerosol lubricant for handpieces and air motors to reduce friction and extend lifespan.

Universal spray nozzle fits all standard handpieces

Used before and after each procedure for maintenance and performance.

Key Features & Benefits

Seamless Integration — All handpieces and the motor connect easily to the wall-mounted unit’s 4-hole ports for effortless switching between high-speed and low-speed operations.

Optimized Performance — The Kavo LED High-Speed Handpiece offers high torque and bright illumination for precision work. The DMX Contra-Angle, driven by the NSK Air Motor, ensures smooth, controlled low-speed finishing.

Durability & Maintenance — The Lubricant Oil Spray protects internal bearings, prevents overheating, and extends lifespan. Recommended for pre- and post-sterilization use.

Space Efficiency — The Wall-Mounted Dental Unit saves floor space, making it ideal for simulation benches, compact clinics, or teaching setups.

Cost-Effective Bundle — Get all the core operatory components together, tested for compatibility, with excellent value for clinics, educators, and students.

Suggested Use Workflow

1. Install the wall-mounted dental unit at ergonomic height near the phantom head or dental chair.

2. Connect air and water lines and test all ports.

3. Attach the Kavo LED High-Speed Handpiece to the high-speed (4-hole) outlet.

4. Connect the NSK Air Motor to the low-speed outlet and attach the DMX Contra-Angle Handpiece to it.

5. Lubricate all handpieces with the High-Quality Oil Spray before and after use.

6. Use the high-speed handpiece for cavity prep and cutting, then switch to the slow-speed contra-angle for finishing and polishing.

7. Perform regular maintenance: clean filters, replace O-rings, and check all tubing and bearings.

HP Maintenance Recommendations

To maintain the efficiency of the handpieces and ensure long-term, reliable performance, please follow these recommendations:

1. Use Distilled Water Only

Always use distilled water instead of tap water in the water bottle.

Tap water contains minerals and impurities that can accumulate inside the tubing and the turbine of the handpieces. Over time, these deposits may cause blockages, reduce performance, and lead to the formation of limescale and mineral residues, which can damage the internal components.

2. Ensure the Compressor Has an Air Filter

The air compressor should be equipped with an appropriate air filter.

Dust particles and contaminants carried by unfiltered air can enter the dental unit and handpieces, causing blockages, reducing efficiency, and contributing to the buildup of internal deposits.

3. Daily Lubrication and Cleaning

Use a suitable handpiece lubricating oil spray and anti-deposit cleaning spray every day.

* Apply the spray before the first use of the day.

* Apply it again after finishing work at the end of the day.

The spray should be applied through all inlet and outlet openings (ports) of the handpiece to ensure proper lubrication, cleaning of internal components, and removal of moisture and debris.

Regular maintenance will significantly prolong the lifespan of the handpieces and help maintain optimal performance.

Portable Dental Unit – Installation and Operating Instructions

Contents of the Box

The package includes the following items:

* Portable Dental Unit

* Transparent air supply tube

* Connection tubing for the High-Speed Handpiece

* Connection tubing for the Slow-Speed Handpiece

* Triplex syringe (pre-connected to the dental unit)

* Foot pedal pre-connected to the dental unit

* Water bottle

Installation Instructions

1. Positioning the Dental Unit

Place the dental unit in a stable vertical position. Ensure there is sufficient distance and space to place the foot pedal comfortably on the floor for easy operation.

2. Connecting the Handpieces

* The first tube, located on the right side of the dental unit, is for connection to the High-Speed Handpiece.

* The second tube, located in the middle, is for connection to the Slow-Speed Handpiece.

* The third tube, located on the left side, is connected to the Triplex Syringe.

3. Filling the Water Bottle

Fill the water bottle to approximately three-quarters (¾) of its capacity only. Do not fill it completely, as sufficient air space must remain inside the bottle to generate the appropriate internal pressure required to deliver water properly.

4. Connecting the Transparent Tube

Connect the transparent tube to the dental unit as follows:

1. Locate the fixing screw at the bottom of the dental unit and loosen it.

2. Insert the screw onto the transparent tube.

3. Connect the transparent tube to the metal connection port.

4. Tighten the screw securely to ensure there is no air leakage.

The other end of the transparent tube requires a suitable connector/adaptor (to be purchased separately) in order to connect it to the air compressor.

Compressor Pressure Adjustment

After connecting the dental unit to the compressor, check the pressure gauge on the dental unit.

If the gauge reads below 30 psi, the airflow from the compressor is insufficient.

To correct this:

1. Open the airflow control valve on the compressor gradually.

2. Operate the handpiece while observing the pressure gauge.

3. Adjust the compressor output until the pressure gauge on the dental unit reads approximately 90 psi.

Important: Do not adjust or tamper with the pressure regulator on the dental unit itself. The unit has already been calibrated and is ready for use. All pressure adjustments should be made only from the compressor side.

Final Checks Before Use

After completing all connections between the dental unit and the compressor, ensure that the following switches on the dental unit are turned ON:

* Air Switch – ON

* Water Switch – ON

* Water Bottle Switch – ON

Once these switches are turned on and the pressure is adjusted correctly, the dental unit is ready for operation.

May cause allergic reactions in sensitive individuals. Users are responsible for assessing suitability before use.For educational simulation use only. Not for clinical or patient use.

Additional information

Weight4 kg
Dimensions300 × 300 × 160 mm
error: Content is protected !!
WhatsApp Facebook Telegram